DRYWALL | TAPE & BED | PAINT
Commercial Drywall Installation, Tape & Float, & Painting by
A-Team Construction


The quality of the drywall and finish out work from A-Team Construction was the level of quality I wanted on this project, I highly recommend their service.. - Joseph A. - Helotes, TX |
Welcome to A-Team Construction – where walls are more than just barriers. They’re canvases for your business’s story, a testament to our unmatched craftsmanship, and an embodiment of our commitment to professionalism and skill.
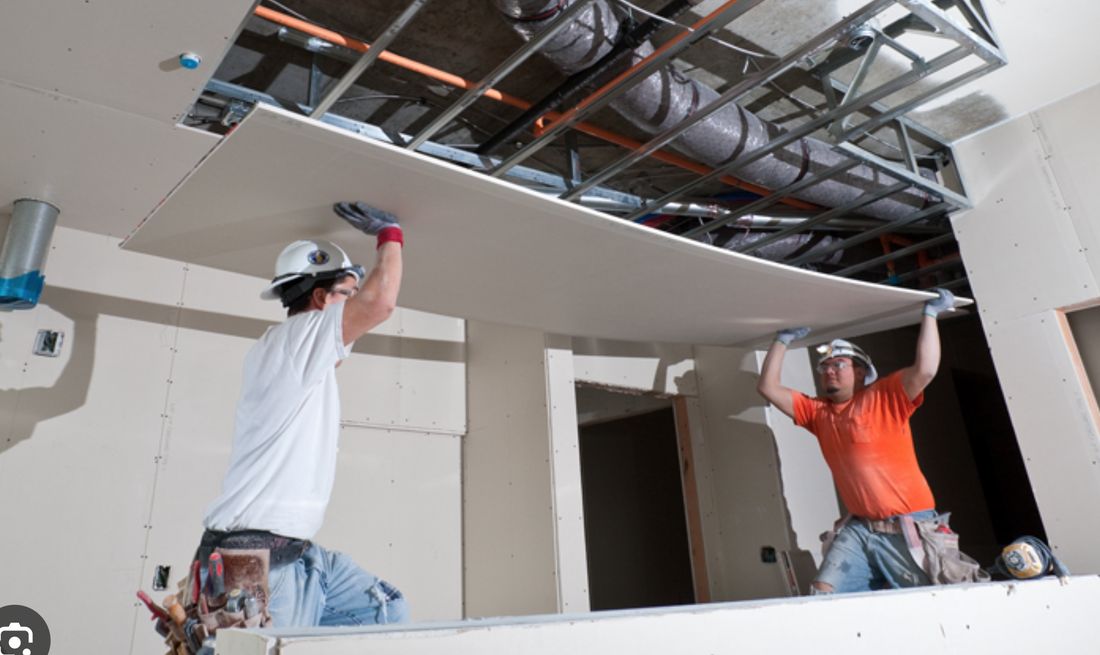
When it comes to commercial drywall installation, tape & float, and painting, our years of experience speak for us. But, it's our passion and dedication to quality that truly sets us apart. Let us provide you with a free estimate for total commercial interior finish out and completion. Commercial Drywall Installation: A good wall does more than just divide spaces. It provides insulation, soundproofing, and a smooth palette for interior decoration. At A-Team Construction, our seasoned professionals understand the intricacies involved in commercial drywall installation.
|
Tape & Bed:
Once the drywall is up, the next step is to ensure that it’s smooth and seamless. This is where our tape and float services come into play.
Painting:
The final touch in any construction process is painting. At A-Team Construction, we believe in turning your walls into masterpieces.
Why Choose A-Team Construction?
Skilled Craftsmanship: At the heart of our operations is a team of skilled professionals who take pride in their work. With A-Team Construction, you're not just getting a service; you're getting artisans dedicated to perfection.
Professionalism: Our name says it all – we are the A-Team. This means timely deliveries, clear communication, and respect for your commercial space.
Experience: Years in the business have not only honed our skills but have also embedded in us an understanding of commercial needs and aesthetics.
Customer-Centric: Your satisfaction is our top priority. We work closely with our clients, ensuring their vision is translated perfectly onto their walls.
From the initial drywall installation to the final brush stroke, A-Team Construction is dedicated to delivering excellence. With a blend of skill, professionalism, and passion, we turn walls into wonders. Reach out to us today and let's build your vision together.
Once the drywall is up, the next step is to ensure that it’s smooth and seamless. This is where our tape and float services come into play.
- Seamless Transitions: Our experts use taping to bridge the gaps between drywall sheets, ensuring there are no visible seams.
- Smooth Finishes: The 'float' process involves applying joint compound in smooth layers to create an even, paint-ready surface. The skill level of our craftsmen ensures a flawless finish, free of bumps or inconsistencies.
Painting:
The final touch in any construction process is painting. At A-Team Construction, we believe in turning your walls into masterpieces.
- Color Expertise: Our team will guide you through selecting the best color palettes to match your commercial space's ambiance and purpose.
- Quality Materials: We use only the finest paints, ensuring vibrancy, durability, and a long-lasting finish.
- Detailed Craftsmanship: Our painting process is thorough, with careful attention given to every nook and cranny. We ensure even coats, sharp lines, and a clean workspace once the job is done.
Why Choose A-Team Construction?
Skilled Craftsmanship: At the heart of our operations is a team of skilled professionals who take pride in their work. With A-Team Construction, you're not just getting a service; you're getting artisans dedicated to perfection.
Professionalism: Our name says it all – we are the A-Team. This means timely deliveries, clear communication, and respect for your commercial space.
Experience: Years in the business have not only honed our skills but have also embedded in us an understanding of commercial needs and aesthetics.
Customer-Centric: Your satisfaction is our top priority. We work closely with our clients, ensuring their vision is translated perfectly onto their walls.
From the initial drywall installation to the final brush stroke, A-Team Construction is dedicated to delivering excellence. With a blend of skill, professionalism, and passion, we turn walls into wonders. Reach out to us today and let's build your vision together.
An Experts Guide - Let us tell you the steps.
Drywall Installation, Tape & Bed, and Finish Out:
When it comes to home renovation or construction, one of the pivotal steps that often goes unnoticed is the installation of drywall. This might appear to be a straightforward process, but several intricate details need to be carefully managed to achieve a seamless and flawless finish. The entire process can be broken down into three key phases: Drywall Installation, Tape & Float, and Finish Out. Let's dive in to explore each of these steps in detail.
Phase 1: Drywall Installation
Materials and Tools:
Procedure:
1. Preparation: Before you start, ensure that your workspace is clean and free of obstructions. For wall installations, electrical and plumbing should be completed and inspected.
2. Measurement: Measure the area where the drywall will be installed and plan the layout of the drywall sheets. It's good practice to minimize the number of seams.
3. Cutting: Use a T-square and a utility knife to score and snap the drywall sheets according to your measurements.
4. Installation: Begin installing the drywall by lifting it into position (a drywall lift can be handy for ceilings). Use a screw gun to drive in drywall screws at intervals of 16 to 24 inches into the framing.
5. Joining: Ensure that the seams between adjacent sheets are as tight as possible. The end joints should be staggered to minimize the visibility of seams.
6. Trimming: Cut out the areas where electrical boxes, outlets, and fixtures go.By the end of this phase, you should have a complete wall or ceiling covered with drywall sheets, ready for the next step.
By the end of this phase, you should have a complete wall or ceiling covered with drywall sheets, ready for the next step.
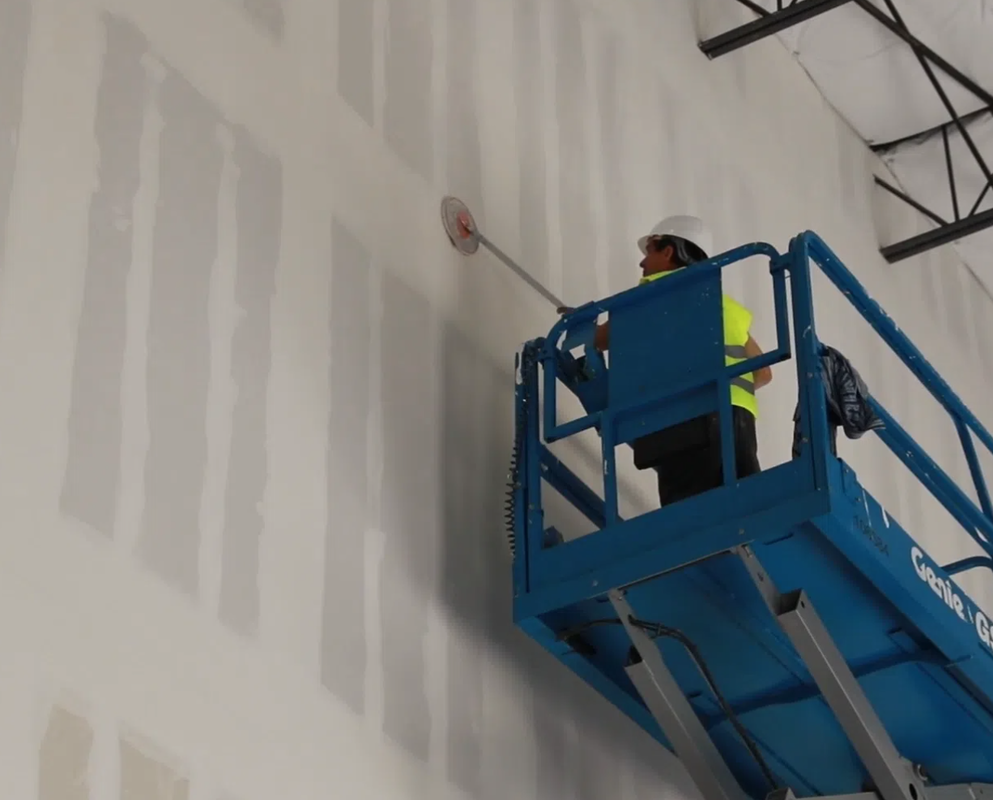
Phase 2: Tape & Float
Materials and Tools:
Phase 3: Finish Out
Materials and Tools:
Drywall installation is much more than slapping some sheets onto a frame. The meticulous process involves precise measurements, expert taping, and skillful finishing techniques. When done correctly, the walls will not only look smooth but will also withstand the test of time. Therefore, understanding and following these steps can make the difference between an amateurish outcome and a professional-looking finish.
When it comes to home renovation or construction, one of the pivotal steps that often goes unnoticed is the installation of drywall. This might appear to be a straightforward process, but several intricate details need to be carefully managed to achieve a seamless and flawless finish. The entire process can be broken down into three key phases: Drywall Installation, Tape & Float, and Finish Out. Let's dive in to explore each of these steps in detail.
Phase 1: Drywall Installation
Materials and Tools:
- Drywall Sheets
- Drywall Screws
- Screw Gun
- T-square
- Utility Knife
- Measuring Tape
- Drywall Lift (optional)
Procedure:
1. Preparation: Before you start, ensure that your workspace is clean and free of obstructions. For wall installations, electrical and plumbing should be completed and inspected.
2. Measurement: Measure the area where the drywall will be installed and plan the layout of the drywall sheets. It's good practice to minimize the number of seams.
3. Cutting: Use a T-square and a utility knife to score and snap the drywall sheets according to your measurements.
4. Installation: Begin installing the drywall by lifting it into position (a drywall lift can be handy for ceilings). Use a screw gun to drive in drywall screws at intervals of 16 to 24 inches into the framing.
5. Joining: Ensure that the seams between adjacent sheets are as tight as possible. The end joints should be staggered to minimize the visibility of seams.
6. Trimming: Cut out the areas where electrical boxes, outlets, and fixtures go.By the end of this phase, you should have a complete wall or ceiling covered with drywall sheets, ready for the next step.
By the end of this phase, you should have a complete wall or ceiling covered with drywall sheets, ready for the next step.
Phase 2: Tape & Float
Materials and Tools:
- Drywall Joint Compound (Mud)
- Paper or Mesh Tape
- 6-inch Taping Knife
- 10 to 12-inch Taping Knife
- Mud Pan
- Applying the First Coat: Use the 6-inch taping knife to apply a thin layer of mud over the seams and screw holes.
- Taping: Immediately embed paper or mesh tape over the wet mud along the seams. Ensure that there are no air bubbles under the tape.
- Feathering: Apply another layer of mud over the tape, feathering out the edges to blend with the drywall.
- Corner Treatment: Internal corners should be given extra attention. Fold the tape along its length and press it into the corner over the mud.
- Sanding: Allow the mud to dry fully, and then lightly sand to achieve a smooth surface.
- Second and Third Coats: Repeat the process using a 10 to 12-inch taping knife for the second and possibly third coats, widening the feather each time.
Phase 3: Finish Out
Materials and Tools:
- Sanding Sponge or Pole Sander
- PVA Primer
- Paint
- Paint Roller and Brushes
- Final Sanding: Once the final coat of mud is dry, use a sanding sponge or pole sander to achieve a completely smooth surface.
- Primer: Apply a coat of PVA (Polyvinyl Acetate) primer to seal the drywall and create a more adhesive surface for the paint.
- Painting: Once the primer is dry, your wall is ready for painting. Use high-quality paint and tools to get the best result.
- Touch-ups: After painting, you may find some minor imperfections. Small touch-ups can be made with leftover mud or paint.
- Clean-up: Properly dispose of any leftover materials and clean your tools. Store any unused paint for future touch-ups.
Drywall installation is much more than slapping some sheets onto a frame. The meticulous process involves precise measurements, expert taping, and skillful finishing techniques. When done correctly, the walls will not only look smooth but will also withstand the test of time. Therefore, understanding and following these steps can make the difference between an amateurish outcome and a professional-looking finish.